Continuing on from Part 1 of this series, a small update.
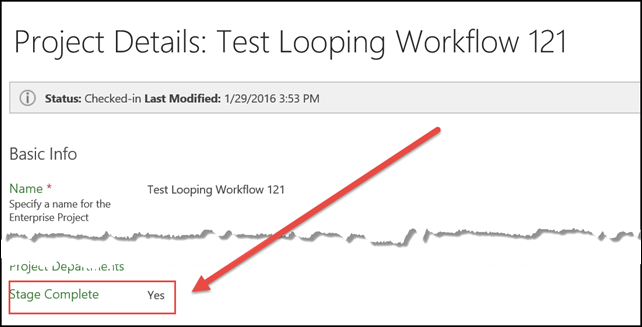
After a lot of experimentation, I found that, using the “Flag” field does not work consistently. Instead create a Custom Field with a lookup table, as shown below. I have updated the previous post as well to reflect this.
Now lets talk about the workflow.
- Start by opening the PWA Site in SharePoint Designer 2013, selecting to create a New Site Workflow.
- Add all your stages into the workflow. For this example, I added three stages: Initiation, Execution and Closing.
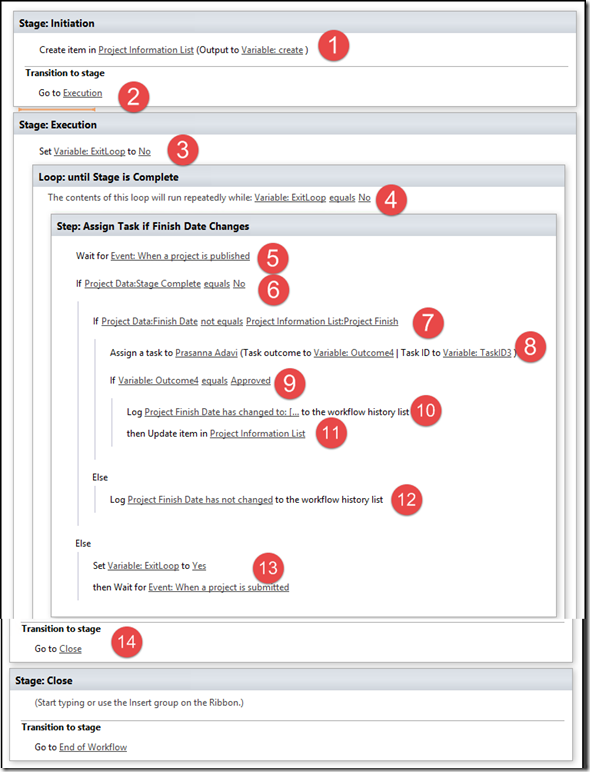
Here is the workflow I built, and I will try and explain each step separately.
 \]
\]
| Step |
Description |
|---|---|
| 1 | As soon as the project is created, create an item in the SharePoint List you created to store the information. |
| 2 | In my workflow, I did not wait for submit to move to execution. In real world you might want to add a “Wait for Submit” event action. I am going to be starting a Looping Workflow, based on a variable ExitLoop. In this step, I set the default value for this variable to be No |
| 3 | In this step, the variable ExitLoop is initialized with a default value of No. |
| 4 | In this step, we are setting a conditional loop, which will run until the variable ExitLoop is set to Yes. |
| 5 | Since we need a trigger point to check whether the project finish date has changed or not, we will use the Published event. This is available in Project Online as an action. If you are on-premises user, then you could use Project Check-In as the event. You might have to play a little bit with the check-in check-out overlap for that particular stage. |
| 6 | The first condition, we need to check is the value of the custom field that we set to let us exit out of this stage, (Stage Complete). If this is set to Yes, then we are ready to move on to the next stage, and no need to get approval for the Finish Date. If it is NOT set to Yes, then we will need to check if the Project Finish Date has changed, and get an approval for the date change. |
| 7, 8 | As explained in Step 6, we check if the current Project Finish Date is NOT equal to the one we stored in the SharePoint List, and if it it is NOT the same, then we assign an approval task to the appropriate approvers. You could assign this to one person, or a GROUP that you set up in SharePoint or AD. |
| 9, 10, 11 | If the date change is approved, we overwrite the date in the SharePoint List, so that we can compare against that next time. And as a best practice log to the workflow history, the change in the Finish date. |
| 12 | if the current Project Finish Date IS equal to the one we stored in the SharePoint List, then we just log into the history list and leave it there. |
| 13 | If the Stage Complete field was set to Yes, in Step 6, we then we exit out of the loop, and just wait for the Submit event, so that the project could move into the next stage without triggering an approval task. The loop will continue until the Stage Complete value is set to Yes. |
| 14 | Once the Stage Complete value is set to Yes, and the project is submitted, then we just transition to the next stage. |
I will try to make a video showing the configuration of the various elements in the workflow. Now let’s see the workflow in action.
- When a project is created, an item is created in the Project Information List (the SharePoint list we created to store the information)
- As the Project enters the Execution Stage, and the project is published, the finish date is checked with the Project Finish column in the SharePoint List and an approval Task is generated as below
- Once the Project Date change is approved, the Item in SharePoint List is updated, and also a message is logged into the history list. You can also use versioning on the SharePoint List item to keep track of how many changes the Finish Date went through.
- And finally, when the Project Manager wants to move to the next stage, he sets the Stage Completed choice to Yes, Publishes the project and then hits Submit. Publishing the project before Submitting is important because, it allows the workflow to exit out of the loop and wait for the Submit Event.
As with anything else, please test this in a test environment, before you implement this in production.
Also, this workflow could be improved with some more logic on how to prevent a submit BEFORE publishing, and error handling and things like what happens when the workflow is restarted and so on.
In my next post, we will review an alternative method to achieve the same functionality using workflows on the SharePoint List, which in my opinion is a lot simpler to build and maintain.
Keep reading… 🙂


Leave a Reply