A common requirement for PMOs is to be able to capture key Project Level data, as the project moves along in the workflow, and to be able to do a trend analysis as to how the Project Budget has changed over time for example or the baseline cost etc.,
If you are using workflows within Project Server 2013 (or Project Online), then you can use them to also capture a snapshot of the key project data. This article will show you how. In our example, We will use a SharePoint list to store this data, so that we can later generate reporting on it.
Note: In a previous blog post, I explored how you could capture a snapshot of key project data, when you have a workflow running on the Project using a Nintex workflow.
Step 1: Create a list to store your project data snapshot
The first step is obviously to create a SharePoint list to store the custom data. As shown in the screenshot below, I created a Custom List, and then added the columns I need, based on the data I will capture into the list. Please note that, it is easier if the list is at the PWA Site collection level, else you will need to use the HTTP Web Service call to create list items. My example has the list at the PWA Site Collection level.
Step 2: Make sure your Workflow stages are created or available to build a workflow on
This is an obvious one. You need workflow stages created and ready to go, if you want to build a workflow. I have two stages in my workflow, for this example, Stage A and Stage B. You can have as many stages as you want based on your business needs. It is the actions between stages that we are concerned with in this blog post.
Step 3: Build the workflow (or Modify) in SharePoint Designer
If you already have a workflow, go ahead and open in SharePoint Designer. If you do not have a workflow, go ahead and build one. For the sake of brevity, I will refrain from go into details of “how to build a workflow”. Please refer to this TechNet Article for step by step guidance.
My Workflow is very simple:
- The Project after getting created, will wait in Stage A, until submitted to the next stage
- Upon the submit action, the selected Project Data is written to the Project Snapshot list, as a new list item
- Project moves to Stage B, and waits there until submitted to the next stage
- Upon the submit action, the workflow ends.
The workflow built in SharePoint Designer, will look like this:
Obviously the key element is, the highlighted one, creating a list item, so lets take a closer look at that.
Step 4: Configuring the Create List Item action
- To start, Click on appropriate place in the workflow designer area, and then click on Actions on the ribbon.
This will add the Create List Item action to the designer area.
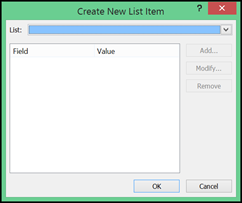
Now click on the this list in that action, to bring up the Create List Item dialog box.
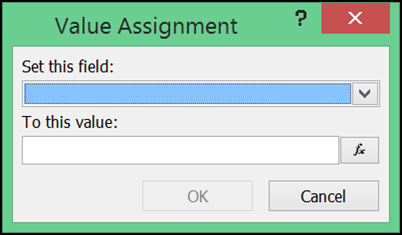
Now select the list, you have created to store your project snapshot. This will bring the default column in, which in my case is the Title (which I renamed as Project Name). Now click on Add, to start adding more fields to the list.
In the dialog box, the Set this field refers to the columns in the list you are using to capture the snapshot, where as To this value, will allow you to set the project data you require.
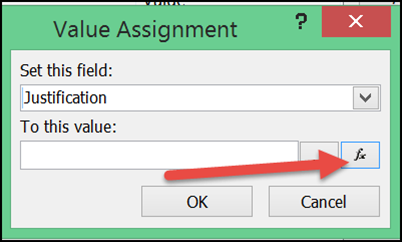
I will select the column Justification as an example. Once you select the column, click on the small fx icon, to bring up the lookup options.
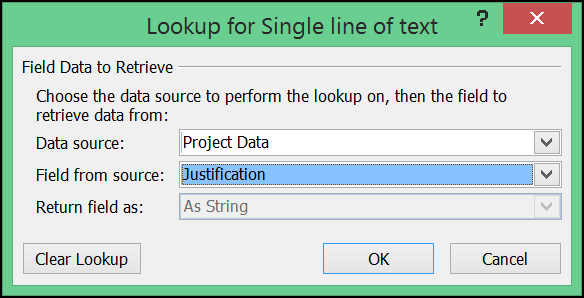
This will bring up the Lookup Selections, and set the values as below, and click OK.
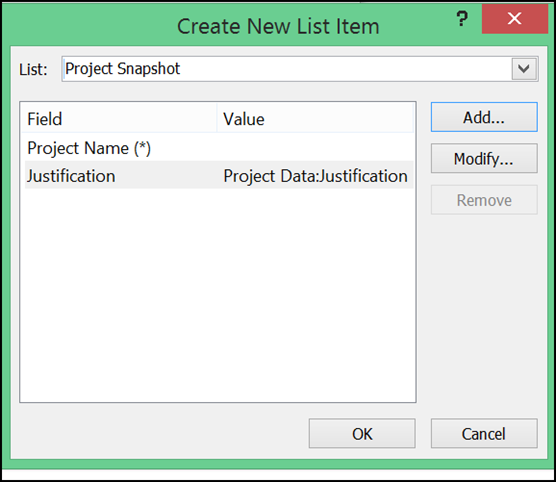
So, the create List Item box, should look like this now.
You can add other Project Fields the same way, as long as you have created the column to store the data in your list.
Now save, everything and publish the workflow.
Go ahead and associate the workflow to an Enterprise Project Type, if you have not done already, and create the project. As soon as you submit the workflow from Stage A to Stage B, you will see that the List has new item with the Project Data Snapshot.
As each project snapshot is captured as it moves through stages, You can now use this data to do Trend Analysis just by pulling this data into Excel etc., or even just Status Reporting.
Enjoy!


January 23, 2015 at 5:34 pm
Thanks a lot for that great article. very interesting.
do you see a way to do recurrent automatic snapshots to have a track of running projects and then build Milestone Trend Analysis?
Thanks Again
Jérome
January 23, 2015 at 5:38 pm
Jerome,
Thank you. I think the context of your question is different. If you are working with an On-Prem Deployment, you could simple write a Stored procedure on SQL, and write data to a table and report on it, and run the StoProc at regular intervals. If it is project online, you have to either use a worklow or use one of the Apps that is available. The issue with using WF is that, there are only 3 events surfaced during the workflow, which is why I had to tie to the Submit Action..
June 7, 2015 at 1:41 pm
Hi Prasanna, Interesting Post. Thank you for Sharing it.
I have an issue with sending approval task to the Portfolio Managers Group.
But when i change the group to the Project Managers (Project Web App Sync), the task is assigned to all the members of the Group. on the other hand the Portfolio Managers (SharePoint Group) group is never synced with the Default Project Server Portfolio Managers Group. If i manually ad users to the Portfolio Managers (SharePoint Group) it works ?
Do you think the sync is bug?
KInd Regards
PDan
October 6, 2016 at 2:24 pm
Hi Prasanna, thank you for this article. It is exactly what I was looking to do in Project/SharePoint but I am wondering if there is a way to execute the workflow to send project data to a list on projects that have already been created? The data I’d like to see would be from Projects that have already been created and moved to a second stage, as well as data from projects newly created.
Thank you
October 7, 2016 at 2:04 pm
Cassandra,
The only option I can think of is for you to restart your workflows, so that they take the new workflow with snapshots built in.
Unfortunately, the current workflow model doe snot allow for any “event-driven” workflow out side of the stage-gate framework.
There could be a way to either use Odata or Microsoft Flow to do this which I am exploring.
October 25, 2017 at 2:23 pm
Hi Prasanna, Thank you for the interesting article, but I have an issue. My workflows stops (error) when the custom field linked to the list field is empty. Only when I all the custom fields linked to the list have content the workflow will run. Do you have a solution for this?
Thank you
June 10, 2019 at 10:24 am
This was a very helpful article. I currently used it to capture Project Status when someone changes them. Do you know if there is any way to capture the User ID or Display name of the person that changed a project status?
September 25, 2019 at 9:07 am
It might be possible. Assuming the person who has the project checked out, will be the person changing the project status, you can hypothetically capture the checkedoutby userID, and use that.